Friday, September 14, 2012

It was a dark and zombie night...

Sometimes when the night creeps in and the boisterous thunder rattles my house, I take cover underneath my warm blue blanket, adjusting myself so I slip right into a peaceful slumber of ice cream dreams and chocolate cookie fantasies. And then I'm abruptly woken up by a faint tapping upon my window, a rhythmic scratching of sorts that rattles my bones and turns my legs into Bill Cosby Jello. But then I remember that it's just Mr. Zombie kindly asking to step inside and dry off, and possibly even consume large portions of my sleepy brain, but it's totally fine; his company on a cold, rainy night is more than enough compensation for any late-night brain munchies.

But last night, it was different. As he cradled me in his bony, wet arms, picking away at my scalp with a particularly sharp tooth, I glumly gazed off in the distance. He paused for a moment as the rhythmic combing of his fingers across my scalp dulled to an abrupt silence. He was hesitant, I could tell, and the silence was a dead giveaway that he was about to confront me and my deep, sporadic thoughts. I had to refrain from suddenly bursting out with an exaggerated  "Awkwaaaard..." "Whatz wrong?" he finally muttered, clearing a clump of curly hair from his teeth. "Mr. Zombie, you know I love you, right?" He grinned, then nodded so fiercely his eyeballs popped out of their sockets and began clacking around. I readjusted myself and sat up, trying to build up the courage to stare Mr. Zombie in his rotting, cold eyes. "Well" I paused for a moment and cleared my throat, "There's someone else."

He smirked slightly and replied: "Well thatz fine. I luv to share brainz with other zombiez. Zombiez love threesome brain eatinz" Oh boy, how am I gonna say this? How am I gonna say this? I lunged towards Mr. Zombie, my face now wet with salty tears, and gently whispered in his ear, "It's not another zombie. It's a human. His name is Dave... Crazy Dave..."

And then it happened. He stood up. He shuffled towards the door. He tripped over the ottoman a couple times as I held my breath to kill the urge to laugh, and then in a moment, he was gone. Well, more than a moment, 'cus, you know, the whole walking-like-molasses deal --- but he was gone. All because of my confession. Of Crazy Dave.

Crazy Dave took great care of me. In fact, he posed for me daily. Which brings me to today's 4 AM blog.


I usually don't post WIP photos that aren't rendered in mental ray, as MR gives a much better suggestion of the surface when interacting with shadows and lights, but 4 AM setting up a lighting rig and rendering a bunch of frames sounds a bit discouraging. Sleep is important too, kids! So here we have just screengrabs directly from Maya. As you can notice, this isn't quite yet Dave - or, at least the Crazy Dave that we've all come to know and love. I mean, sure, there's the frying pan on his head, and that goofy grin with the two teeth, but he's also missing one of his key visual elements - hair! He's lacking the beard and the hair, and without that, it's just merely a suggestion of Crazy Dave.

But I'd like to point out a few things, some liberties I took when designing Crazy Dave. There's practically just one image of him, used over and over again, slightly modified to suit the context of the situation, but I've yet to come across multiple angles of Dave. Know what that means? We have to intelligently guess the proportions that aren't explicitly suggested in single-angle image that's floating around the web. I added some fat rolls to the back of his neck - I thought it'd be appropriate, since he's a slightly heavier character. His nose is like a wide baked potato, but he's lacking nostrils, which I think enhances the cartoon element even further (think Cloudy With a Chance). I used a deep shader on eyebrows, despite the correct color design for any hairy parts of Dave to be brown. The shader enhances the contrast so I can pick up on a general idea of what sort of color balance we'll be looking at later down the road when it's time to texture.

Some things I'd like to point out: Right now Dave is pretty soft and curvey, but the character illustrations suggest that many of his facial features are a bit more tight and angular. It's a style that I absolutely cannot get enough of, over exaggerating the angles and applying a beautiful SSS shader to replicate straight skin. So really pushing those angles and enhancing the edges, particularly around the brown region, is something I'll jump on next time I work on this model. There's also a recessed area that should be located in the orbital region, sort of giving the illusion that his eyeballs are actually just two spheres glued onto the surface of his skin rather than sitting tightly between the eyelids. The mouth should come down to more of an angular slant, mimicking a 'V' shape, and we have to tighten up the edges around the corners of the lips so it feels more restricted, more closed. There are also some essential key angles in the illustration for the brow to the forehead back to the top of the head. Straight edges.

See, ^^^ these are some of the things you should be focused on when modeling a 3D character based off of 2D reference images. You need to see the character in 3D, carefully analyzing all of the 2D photo reference images and picking out defined angles, spacial relationship, and curves. It's not difficult really, but you just have to be aware of what to look for. Sometimes a certain set of angles will really define the character and give him his personality, and if you skimp on those details, you might begin to portray a completely offset 3D representation.

Anyway, it's time for bed now! Up in a few hours for sleep! Do zombies need sleep?

I love you all,
Jon


Sunday, May 13, 2012

Foreground Utility

I've stumbled upon a little imaging utility that I'm sure will come in handy someday. It allows you load an image into the software, set the opacity, and keep the window in focus and the slightly opaque image overlayed ontop everything on your screen. What's the purpose of this? The possibilities are endless, my zombie-loving brethren!

I can see particular benefits in 3D modeling packages that don't allow the user to easily import image planes for reference. It can come in handy in Maya or Zbrush also, where importing reference images are generally intended for orthographic views. If you have an image of a female with her head titled slightly, not parallel to the camera, you can rotate your model in the viewport to match the same angle as the image and work from there. Also, in any 2D imaging software, I assume it'll work nicely to fire up the program and give yourself a reference to trace over without needing to add additional layers. It's about the speed, man. And a lot of it, too.

Though I have no particular use for this at moment, I'm sure in the near future I'll be opening it up, loading some reference images, and thanking the author profusely for a timesaver.

You can grab it here: http://www.digitalartistguild.com/misc/UtilityExplain/UtilityExplain.html

But don't grab it too hard.


Saturday, May 12, 2012

These past few days have a been a bit unusual, perhaps borderline insane-asylum-warranting, but the mere thought of my zombie companions passionately nibbling on my scalp has gotten me through these relentless tides. Just remember - if you ever feel down, snuggle with a zombie.

Unfortunately, my week long vacation is quickly coming to an end, which means my progress on this project will undoubtedly shift into slow gear - but don't worry, there won't necessarily be a noticeable difference in updates, considering my focus this past week hasn't been entirely on recreating the walking undead anyway. Here's my current progress update:

Whenever I'm working on character development, I jot down thoughts at they come to mind - mainly for the purpose of sharing with others, but also with the intent of future reference. That's the justification for my rapidly expanding text file full of fragments and backwards notes about 3D modeling. Rather than fleshing them out into full fledged paragraphs full of deep, logical information, I'll just bullet point it. And share it with you, of course. Because, really, who doesn't love sharing? 
  1. You can achieve creases by placing two edges closely together. This essentially creates a tight strip of polygons that, even when smoothed, retain a sharp-edged appearance. In the zombie model, this can be found around the lips, creases around the mouth area, and with a bit of modification, the wrinkles on the forehead.A lot of your time will be spent rounding surfaces. 
  2. When you need more resolution in a specific area of a mesh, you'll insert a new edge. If the surface is to appear even and flowing, it's generally best to insert the new edge directly halfway inbetween the two existing edges.
  3. When you're rounding out an area, you're concentrating on all of the edges/vertices between the first edge and the last edge. Imagine the curve and think of how the vertices should be appropriately placed to transition from point A to point B evenly.
  4. When working from a reference image: if you're not using image planes directly or the reference image isn't very accommodating, you'll need to be extra particular with proportions. A good approach to translating proportions from a 2D drawing to 3D space is continuously comparing relative distances. For example, how far is it from the chin to the tip of the nose, from the tip of the nose to the top of the eyebrows, and the finally from the chin to the top of the eyebrows? This is actually a common technique when doing any life drawing, and it's definitely applicable in a 3D environment as well.
  5. Like the previous tip, this also applies to sculpting in real life: always look at your model from various angles, and I don't mean just the general orthographic views (front, left, top, etc.)... that alone simply won't cut it! Hop into the perspective panel and rotate the viewport, looking at your model from all angles imaginable. With the viewport's focus on the model itself, slowly drag and rotate and make sure that nothing looks out of order.
  6. Regarding the above tip, viewing your model at unusual angles is key to really defining the curves and smoothing the surfaces. I've bolded this tip for a reason;  trust me - a curve that looks perfectly even in both the front and side views may still appear uneven or offset in 3D perspective. Rotate around your model and you'll easily see uneven surfaces (don't underestimate this tip. If someone had explained this to me when I first began modeling, it would've saved me so many headaches rather than struggling and figuring it out myself. You have been warned, zombie babies!)
  7. I'm spending quite a bit of time really refining this zombie and getting his proportions right, and that's fine, simply for the fact that he's going to be reused. Over. And. Over. We need a strong base template, and using this model, we can easily change some proportions and tweak some physical features to morph him into every other zombie in the PvZ universe. This will save us the trouble of having to model each zombie from scratch, which increases efficiency and cuts down on precious time (though, since this is a personal project, there is no time limit!). In fact, this technique of reusing and tweaking a model is common in the big studios. In Pixar's The Incredibles, for example, a generic human character was modeled. For any scenes that required crowds or large audiences, the generic human character was cloned numerous times with proportion adjustments made to each duplicate, resulting in an audience full of diverse characters - all originating from one single mesh!
  8. The idea of reusing assets isn't specific to entire models either. Common body parts can easily be imported and stitched onto your models. Hands and feet are some of the most commonly recycled parts, and most of my models use the same exact ear mesh, just slightly modified to suit the character.  I first heard about this technique many years ago when reading through Paul Steed's "Modeling a Character in 3DS Max" (good read by the way, but might seem a bit outdated now!).
  9. Areas that won't be a focal point don't need as much attention. I hate to say that, as you might think it encourages laziness, but when time is an issue and deadlines are imminent, you have to search for efficient approaches. Think of areas where the camera would most likely never reach in standard shots. Deep inside the mouth, behind the ears, underneath the hair - these are all regions that won't stay in focus too long. In the event that a certain shot calls for a closeup of one of these areas, you can create a separate mesh with the desired detail.
  10. Adding a black surface shader (an area that's unaffected by light) is great for grasping a better idea of color balance. It enhances contrast and balances focus. Areas such as the pupils, inside the mouth, and inside of the nostrils work well with a surface shader (meaning, in the viewport and in renders, any area a surface shader is applied to will be completely black).
  11. A lot of the time when adding resolution to your mesh, you'll end up with a bunch of extra edges that have absolutely no purpose. Don't be so quick to delete them - I found that over half of the time, those extra edges do come in handy later down the road. I might add a couple of additional edge loops to the stomach, and end up with some extra edges extending up to the chest I have no use for. Later in the modeling process, I'll find that I need some edges to define the pecs, and - OH GOODNESS, THE EDGES HAVE ALREADY BEEN CREATED BY PAST JON WHEN HE WAS WORKING ON THE ABS. THANKS!
  12. Don't go too crazy though in adding too much detail before you shape. My philosophy (most of the time) is to adjust and smooth any new vertices as soon as they're created. If you continuously cut and cut and cut, without taking a moment inbetween to shape the new edges, you'll end up with a super high resolution mesh and a confused gaze in your eyes as you try to figure out how to shape this big mass of points. Ignoring this approach in digital sculpting software such as ZBrush, where resolution is key, can completely leave you drowning.
  13. Sometimes you need more resolution in a particular area, and you know for a fact that you don't foresee the surrounding areas ever needing more resolution in the future. Don't be afraid to cut new edges that could potentially result in tris or ngons (3 sided polygons, and 5+ sided polygons). In the end it's good practice to aim for quads, considerably in areas that will be heavy animation points, but while getting your model all planned out, don't worry so much!
  14. Jumping off from the above point, I use this approach extensively. I never let ngons or tri's stop me from continuing. Heck, if I stopped every time I saw that a cut I'd make would introduce a non-quad polygon, I'd probably never even finish half of the character models I start. I establish the figure first, with little focus on the ensuring it's a full quad mesh, and once I got a solid figure constructed, then I go and try to eliminate triangles and ngons. Most of the time, a triangle works itself out as you progress. A new edge unintentionally turns that triangle into a quad.
  15. Sometimes your mesh will be too dense in certain areas, containing way too many verts and tossing the topological balance off completely. There are methods for optimizing meshes, techniques that deal with converting 3 polygons into one, getting rid of tri's, etc. There are numerous sources online with valuable information regarding these techniques, but if anyone is interested, I'll share some too.
15 tips for today! I'll keep a numbered list so you can keep track, and see if you can collect them all! 

Tomorrow (technically later today, actually!), I'll discuss the current progress on Mr. Zombie, explaining some character design decisions, liberties I took with balancing his anatomy, and  key elements relevant to constructing a strong figure. And remember - If you don't snuggle with a zombie, you'll struggle with a calm tree!

-Jon


Tuesday, May 8, 2012

Mr. Zombie Would Like a Word

"Mr. Zombie" is actually a term of endearment I coined for the lovely standard zombie. He spends all of his evenings trying to trudge past an unforgiving army of treacherous plants, being pelted with golfball-sized peas and getting his head cracked open by massive watermelons. And when he finally evades the shower of projectiles and slips past the stinky garlic, the savory scent of used brain filling the air, he gets run over by an automated lawn mower. Armed with a handful of decaying teeth and an unwavering determination, he skillfully manages to destroy an entire lane of ceramic pots and sunflowers, decapitate a sinister piece of corn, and crunch his was through an entire morbidly obese wall-nut --- only to be run over by a lawn mower? Seriously, The least anyone could do is pay him a bit of respect for his unsuccessful ventures. He works hard and never prospers, and don't even get me started on the pay blocks and questionable lack of health benefits. I feel mildly disappointed, perhaps even a bit ashamed, every night when Mr. Zombie slides through the door, undoes his tie and cradles his head in his arms, sobbing uncontrollably, while listening to Frank Sinatra on vinyl. No grown dead man should ever be put through such relentless suffering.

So please, next time you're sitting around with your lady friends, sipping on slightly fermented wine and bragging about what an incredible horticulturist you are, remember Mr. Zombie. Remember Mr. Zombie's lifeless body being mercilessly mangled by your unforgivable sin: planting a bunch of peas on your lawn.

Now, back to business.

Here's my current progress with Mr. Zombie's 3D model:
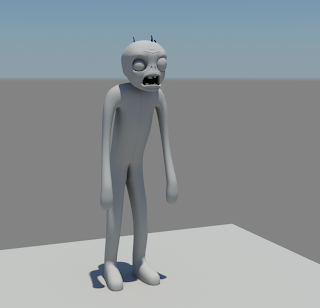
I usually prefer to make production quality renders when working on more complex figures, as it gives a much clearer picture towards the finished model. In this case, Mr. Zombie was rendered with Mental Ray using Final Gathering and Global Illumination. The default sky lighting rig was used without any modifications, creating a nice, smooth fill that reflects nicely and casts soft, appropriately-opaque shadows. The material is the Mental Ray-specific "mia_material_x_passes", with a deep surface shader applied to areas light wouldn't necessarily radiate (inside the mouth, the nostrils, his pupils, etc.). This type of render setup is best comparable to clay - the environment and all objects appear soft and slightly malleable, and depending on the material settings, lose most of their glossiness and reflectivity. For this particular material, I've turned the glossiness down to about .15 and the reflectivity to .14, resulting in an ever smoother, tacky appearance.

As you can tell, this is far from finished. Why, Mr. Zombie appears to be naked! (Though I'm absolutely certain no one is complaining about that). But as this is a continuous work in progress - and we're here to discuss character construction and explore modeling approaches - no WIP image can go unposted!

Let's start off with the reference image I used while creating Mr. Zombie.
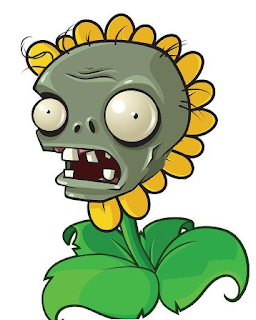
It's a bit of an unusual mashup - Mr. Zombie's head posted on sunflower's body, seemingly a Photoshop alteration. Either that, or Mr. Zombie had a long standing affair with Ms. Sunflower and she consequently gave birth to a deformed, vile contradiction that only your hairy aunt Bertha would love. Regardless of its origins, I chose this image for two reasons: 1) It gives us a solid reference for his face, displaying specific features with adequate detail, and 2) This is literally the only official angle you can find of Mr. Zombie's face. Okay, there's one more image, but he's drawn in a manner that looks nothing like this construction. But really, did the graphic artist at PopCap get fired or something before he could draw more than one image of Mr. Zombie? I've scoured the web, and every single official PopCap-created image of Mr. Zombie feature this same exact face, just modified to suit the situation (toss a bucket on his head but use the same face image, toss a cone on his head but use the same face image, make him a dancing zombie by outfitting him in a laughably puny afro and gold bling your dog would kill for, but use the same face image). Either that or he's a distant relative of 2D Face Girl.

Looking at the image, we can pick up on a few details. First off, we notice that his design actually somewhat defies symmetry: his eyeballs, as well as his nostrils, are slightly smaller on the right, the wrinkles on his forehead curve to different degrees depending on what side of the seam it lies on, the slim, black strands of hair spotting his bulbous noggin aren't placed in any particular fashion, and don't even get me started on that plaque party going on in his mouth. Asymmetrical models, though requiring additional steps, generally don't pose much of an obstruction to the modelling process. Once we're finished modeling the character in its entirety, we can remove any symmetry and begin modifying and adding verts to break up the symmetry and match the reference images. This is why the above render is still completely symmetrical - we haven't yet reached a point where we can mirror the geometry and edit each side separately.

Next, we'll want to focus on the some of the major facial landmarks, certain features that serve as focal points or may demand a more precise topology. When considering the construction of your character's face, or any portion of your character for that matter, it's helpful to imagine where loops of polygons would best sit to ensure a smooth, continuous surface without any jarring aesthetic interruptions (unless, of course, it's intentional). There's no single answer for deciding where to put the edge loops, or even specifically how each should flow, but after 3D modeling for some time and visualizing the surface direction of your character, you'll gain a greater understanding of the topology construction. Thankfully, there are, however, some fundamental guidelines you may want to follow that are generally universal for all character faces - human or anthropomorphic. Take a look at this image:
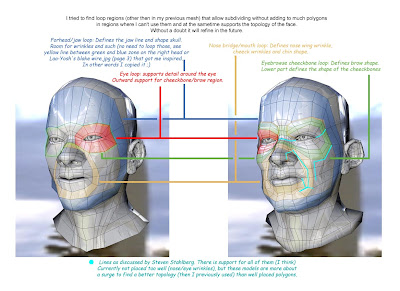
I'd credit the original author of this image, but it's currently unknown. As you can see by the note at the bottom, the edgeloops were influenced by Steven Stahlberg's discussion on facial topology. He does some incredible work by the way! The colored edgeloops indicated in this diagram serve as the basic topology you'll find on just about any head. Their purpose, besides creating a smooth, flowing surface, is to ensure that all movable features will deform correctly when it comes time to animate. If the edgeloops properly follow the facial muscle contours, they'll also deform realistically as muscles do. Of course, all of this is a bit of a generalized statement - it's not necessarily as easy as tossing in a bunch of edgeloops and calling it a day. Depending on your character's complexity, he may have numerous edgeloops in the most bizarre locations, crossing each other and breaking off at any given point. It's an exercise of managing multiple edgeloops, accommodating their flow to the surface characteristics of your model, and ensuring that everything is continuous, even, and meaningfully contributes to the overall topology.

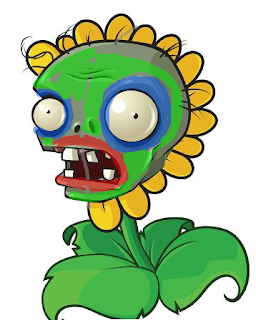
What is this monstrosity, you ask? Did Mr. Zombie finally crack and decide to pursue his lifelong dream of becoming a clown-zombie-sunflower hybrid? Though I occasionally coax him into getting out the old magician's hat (you should see his "eyeball-pop-out-of-the-socket" bit, pure genius!), this image is actually a preliminary diagram of Mr. Zombie's facial topology. In Photoshop, I created a new layer above the reference image, turned down the opacity slightly, and begin marking out some basic edgeloops to keep in mind during the modeling phase. Like I mentioned before, it's always great practice to have a solid diagram of topology intents, despite how ridiculously (sexy) it makes Mr. Zombie appear. With this approach, you can lay down the foundation of your model easily, and work in the finer details and inbetweens as you go along.

I recommend planning out the general topology before you begin, but some people prefer to have it almost completely solidified on their diagram before they even place one vertex in their scene. A very talented 3D artist by the name of Eric Maslowski literally draws just about every single face over his reference image before moving to 3DS Max. Sometimes a bit of a tedious process, especially considering you're working in a flat 2D space which makes it a bit more difficult to visualize a 3D representation, but believe me - it does have its benefits. Since you're establishing all of the groundwork before hand, reconstructing it in 3D should be a breeze. It becomes a matter of simply rearranging the vertices upon one axis, instead of three. Also, you'll encounter any hiccups in your topology before you bring it into your 3D modeling program, and it's undoubtedly much easier to change something on paper than it is on a massively humungous 10K polygon model. Check out his free video series tutorial here, it definitely jump started my edgeloop and topology understandings.

You can construct your model in multiple ways, the most popular being box modeling, patch modeling, and NURBS modeling. Box modeling is, as the title suggests, beginning with a polygon box and cutting edgeloops, adding vertices, extruding, shaping, and tweaking until you reach your finished model. Although the word 'box' is right in the title, it's more of a loosely termed technique; you can box model beginning with a sphere, a rhombus, a triangle, or any other shape you can imagine. The technique is more described as starting with any given polygon object, and cutting, modifying, and refining it into something else, and is usually comparable to starting with a slab of clay and adding detail. Box modeling is suited for both organic and inorganic objects. Patch modeling (also commonly referred to as edge modeling and point modeling) is beginning with one polygon, or a set of flat polygons, and extruding the edges while merging vertices, cutting any additional edges, and shaping the faces. This differs from box modeling in the manner that patch modeling usually requires you to have a topology plan in mind beforehand - since you're building detail from the ground up with every single extrusion, you'll need to have a plan of where each face sits.

I often like to adhere to the analogy of sketching vs. finished drawing to describe the differences between box modeling and patch modeling. Say you're attempting to draw a portrait of a young lady in a forest. If you took the box modeling approach, you'd block out all of the trees first, and the figure, sketch the ground, do some very simple shading, and after the gestures are done, you then go in and refine and add all the little details. If you took the patch modeling approach, you'd work the details in as you go and not bother with a preliminary sketch - perhaps starting with the lady, refining her face very carefully, then making your way to the trees, drawing each leaf, and then to the ground, carefully shading every minute detail as you work your way across the canvas. The benefits of box modeling is being able to have the groundwork established and only needing to work in the finger details - your boundaries are already defined, and you know the area to work within. Patch modeling has the advantage of establishing the detail early on during the modeling phase, so you know exactly what needs to be adjusted as you go along. So which is better?

Both play well in different situations, but at the end of the day, it's just purely the preference of the artist as to which technique to use. Personally, I always use patch modeling for heads, as they require a fine level of detail and I like to see the topology being constructed from the ground up so I know everything plays nicely together. For bodies, I generally use box modeling - it's a quicker approach, and I like to have the solid figure blocked out before doing any detailed refinements. For inorganic objects, such as tables and desks and machinery, I always jump to box modeling. It helps with ensuring the object has a solid, sharp feel, and it can be a major time saver for larger objects.

How about NURBS? NURBs - Non Uniform Rational B Splines - work well in their own category. While box modeling and patch modeling could be compared to raster graphics, NURBs could be considered closer to vector. Depending on the situation, it lends for extremely smooth, flowing surfaces, and it works well in areas that other modeling techniques might struggle. Eyeballs, though completely possible with polygons, can benefit from the smoothness of NURBs. The drawback though (and of course, there always has to be one) is that NURBs aren't necessarily as friendly or easily editable as their polygon counterparts. A different set of tools is required to do modifications to NURBs, and depending on what you're attempting, things could seem slightly confusing. Rather than editing individual polygons, you'll be working with control points, which are more like reference points indicating where the NURBs surface should flow next. Truthfully, to knock down my seemingly (hopefully) knowledgeable foray into 3D animation, I'm not all that well versed in the abilities of NURBs. I've used them, but not extensively enough to give you the greatest benefits and list a series of situations where NURBs would be more suitable. If you take just a few moments and Google "NURBs", you'll find a plethora of information.

Now I must redeem myself for my confession.

There's a lot of information to be taken in in this blog post, so be a sponge, my brethren, and expand your minds with the words I have spoken! But not like Spongebob - that guy's a jerk. Didn't even hold the elevator for me. In the next blog post, we'll be discussing some techniques for adjusting vertices to ensure the surface retains a smooth appearance. We'll also talk about methods of translating your character's proportions into three dimensions. Until next time, keep it classy, keep it sassy.

-Jon

Monday, May 7, 2012

Intro to 3D Character Concepts

I feel just absolutely horrible... I have to confess, the guilt is quickly becoming unbearable - I already started on this project last night, despite having created the blog today. I was just too anxious. On the plus side, it means I already have some in-progress work to share and a laundry list of character construction topics to discuss, so... let's discuss!

There are two types of characters you can construct a 3D model of - those that have been created by someone else (recreations), and those that you've created yourself (originals). There's a considerable difference in each approach and varying amounts of liberties you can take with either. Of course, if the character design was created solely by you, and you're not under the watchful eye of an omnipotent superior who manages your every decision, you can go crazy with your creation. Give him horns. Give him Jay Leno's chin and Kristen Stewart's lovely smile. If there aren't any restrictions you've imposed on your character design phase, the only limitations are your imagination... and er, what's possible through your 3D modeling package. Though I don't do it nearly as often as I should, I enjoy working in this manner -  sketching out the 3D model as I go, adding whatever I please - despite how jarring or aesthetically distasteful it appears - and sitting back while laughing uncontrollably at the monstrosity I've given life to. It's a mental exercise of sorts to enhance artistic creativity and knock the boundaries off of visual character exploration. Plus, it gives you a chance to hone your 3D modeling skills and create bizarre, organic forms you'd most likely never encounter in reality.

Recreating a character from reference images is a bit of a different game. The reference images serve as a specific map of sorts, giving you detailed visual instructions on the appearance of a character, but a considerable problem exists - the references images exist in only two dimensions. They're drawn on flat sheets of paper, sketched out on used napkins, or even painted as hieroglyphs on a deserted papyrus scroll (thanks a lot, Egypt!). Whatever medium your reference images exist in and on, your task always remains the same:   recreate a flat image into something three dimensional.

You have to observe the images, analyze them, think them through, literally toss questions around as you brainstorm an efficient approach.  How will this character's nose translate to a third dimension? How will this other character's tentacles freely angle as they reach his base? And how about this jawline, does it recede as it travels towards the cheekbones, or is that an illusion visible only in a flat, 2d drawing? These questions don't exist only in the pre-modeling phase; as you really dive into the character, adding faces, cutting loops, pushing verts around, you'll begin to stumble upon heaps of other visual anomalies - features that seem to defy what the reference images suggest. And sometimes, depending on your reference images, the 2D drawing just can't translate 100% into the third dimension without making some noticeable modifications. Perhaps the character design artist wasn't fully aware of how a character's lock of hair falls over her eyes in 3D, while the 2D references images suggest something else. It becomes a task of problem solving, which is a good way to summarize the beefy work aspect of 3D modeling:

3D modeling is a huge game of problem solving.


But that's not all it is; seeing a character come to life, given personality, constructed from one vertex into a full sized behemoth - all throughout the entire process, reaping the visual rewards of your hard work and determination, literally watching as a seemingly incoherent mess of faces and edges are carefully moved and shaped into a valiant dragon hunter, a cartoon puppy dog, or even an alien named Mort with an insatiable desire to envelop the entire world with nonstop dubstep (I'd surrender immediately). It can be a tolling process at times, reimaging something into 3D, but when it all comes down to it, it's fun. Plain and simple. And if you can't have fun, why are you even pursuing it?

One more quick topic I'll touch on before I conclude this post - design liberties. Basically taking what the character design artist made, and modifying it in ways you believe holds aesthetic benefits. Sometimes you'll be handed a design to emulate in 3D without any say as to how the character should translate. Think the eyes are too big? Too bad. How about the mouth, could it be angled slightly to increase the character's uncertain personality? Too bad. And sometimes, you just want to thrash away at the reference images and completely make it your own, consequently equipping yourself with a muzzle and handcuffs to restrain the artistic beast within your mind. Fortunately, in some situations, you'll be able to discuss with the design artist some modifications that would, plain and simple, look better in 3D. Unless the character design artist also spends some considerable time with 3D modeling packages or has a strong sense of 3D visual space, they might not necessarily always be aware of things that just won't work... focal points in 2D that get completely lost when overpowered with other features in 3D... or perhaps how unusual the character looks from a specific angle in 3D, while on paper, it looks just fine. These are things you'll definitely want to keep an eye out for to save some headaches along the way.

In time, you'll develop an eye for picking out features that seem to convert well with an extra dimension while recognizing other features that serve as problem areas. Try to be aware of these areas early on in the 3D modeling stage, as making one seemingly minor adjustment could require hours of pushing verts around if you've gone too far in the modeling process. Look at your reference images, imagine the topology, and think, "will this work?"

And last note, edge flow. It's always a good idea to, if your references images were constructed in Photoshop or other similar image editing software, open it up, add a new layer to the image, and in a contrasting color (usually red or blue work, depending on the character's color scheme), sketch out some basic topology over the character's image. Sometimes it's easy to visualize beforehand the edge flow without even needing to do any preliminary topology sketches, but for more complex, organic figures with a demanding design, sketching some faces here and there can only help.

Fall asleep yet? No? Good. After reading this massive blog post (without any pictures, mind you!), I recommend grabbing some aspirin, dressing up in your leopard skin tights, and jammin' out to a few sessions of Richard Simmons' Sweatin' to the Oldies.

In the next blog post, I'll start discussing some character elements and design decisions specific to the standard zombie in PvZ, as well as introducing my reference images and touching on certain areas that need focus before the modeling phase.

As the Pussycat Dolls once said, I'll Stickwitu. But only if you stick wit me.

-Jon

And the Dawning of the Zombies is Upon Us

We're quickly approaching the halfway mark of the year, which means just a little over 6 months until we all meet our inevitable Mayan-predicted doom when December 21st rolls around. It's undoubtedly scary, but the cool part is --- I'm pretty sure we're all gonna turn into zombies. Like, it's almost scientifically proven that come December 22nd, the whole entire human population will be wiped out and the earth will be repopulated with a massive hoard of the walking undead. It's gonna be pretty sweet. So in preparation of this 100% factually, inevitable, scientifically proven claim (read: it's gonna happen; you're gonna be a zombie), I decided to dedicate these last few months of zombie-free life to an homage to my favorite RTS game ever: Plants Vs. Zombies.

I'm hooked on this game. It's my digital crack. And PopCap is my dealer. PvZ is one of those games I always saw plastered through message boards, sitting in advertisements, brief mentions of it through passing conversation with my imaginary friends. It wasn't until I finally purchased an iPad and happened upon it on the appstore that I finally had the opportunity of playing it. I generally tend to disagree with the masses when it comes to a fun game (I didn't enjoy Halo, or Mass Effect, or any of the Fable games - please don't hurt me or stop reading my blog), so I assumed PvZ would take the same route. Fortunately (or unfortunately), I was hooked, love at first sight, and whenever PvZ was out of my reach, I became detached, despondent, a slave to the my insatiable thirst.

I'm not sure if it was the bright, colorful graphics, the ingenious gameplay and deep strategic elements, or the way the zombies seductively yell that they're coming whenever they first make their entrance. I played and played, until I could play no more. Because I completed the game. And then I played some more. The iPad version just recently received a massive update, with new achievements, a barrage of new mini-games, and the greatly anticipated Zen garden (which seemed to grace every other version of PvZ). Needless to say, I excitedly downloaded the update, shelled over my precious money for some in-app purchases, and isolated myself in my room as I lead a hoard of botanical beasts towards victory over the eye-popping, non-stoppin', jaw droppin', slow walkin' sexy zombie elite.


Mmmm... 
But I wanted more. Sure, I loved seeing their little pixelated bodies trudging from one end of the screen to the other, occasionally taking a break to wink at me and reaffirm their undying love for me, but I wanted to see these zombies existing in other locales, other mediums. And then it hit me - which hurt a lot, because zombies pack some serious power in those bony mitts. But then I got an idea - why don't I recreate a zombie in 3D? As, a digital 3D model in Maya. Seemed like a fun idea - I love 3D modeling, I'm pursuing it as a career, and what better way to gain a bit more practice than making a digital model of one of my favorite characters? But, no, the thought didn't satisfy me the way it should've, it didn't please me unconditionally as one should be pleased when fantasizing about making 3D zombies. I wanted more. Maybe not just recreating the general zombie, but how about the Football Zombie? And Snorkel Zombie? And maybe, just maybe, even Buckethead Zombie could get in on the action too? But wait, if I'm dedicating so much time to transforming these little vector* buddies into full blown 3D models, why don't I go the extra mile and recreate every zombie? Heck, why stop at zombies? Let's do all the plants too! And Crazy Dave! And Zomboss!

And so, today, in the extending depths of a cold, dark room, an idea was born. Burning brightly, snuggled within a warm wool blanket, the shade of the serene ocean's baby blue on a cloudless afternoon. And this guy, right here, decided he'll make it his sole purpose in life, to reimagine PopCap's amazing array of characters into something much more tangible, more accessible, more... three-dimensional... And time? Time is the essence of an overactive mind, for time ceases to exist when one settles themselves in the midst of their work, their love, their enjoyable leisure. But alas, I'm currently a slave to full time employment in fields which do not satisfy my artistic longings, so... in otherwords... I'm taking as much time as I need, because this is a side project. It could take me weeks, months, years, or even a few millenia if the zombies don't behave.

My goal in the end is to have a 3D model for every single plant and zombie in the game. Textured? No. Rigged? No. But they'll be created in a manner that they can easily be textured and rigged in due time, having proper, clean topology and a seamless surface. And now, the moment you've all been waiting for - the purpose of this blog!

I'm going to use this blog as a means of communicating with anyone interested in this project, offering tips, advice, approaches, and any other details pertinent to recreating any 3D model from solid references or pure imagination. Follow along to see one young man's journey of recreating every character in Plants Vs. Zombies as 3D models, and maybe learn a thing or two (or five but not more than seven) along the way.

When it all comes down to it though... I just f**king love Plants Vs. Zombies. That's it.

And now, onward ho!

-Jon


---------------------------------------------------------------------------------------------------------
*Note: before some tech-savvy, tree hugging, pole dancing nematoad jumps down my through, I'll clarify that the graphics technically are not vector. To my understanding, it was created with vector-based imaging software though, then simply screencapped and converted to raster.